Annie Sloan Kitchen Cabinet Paint Colors


Our home was built in 1988 and came equipped with lots of dated brass fixtures and oodles of oak. Did I mention the arched raised paneled everything? I knew right away I would be painting the kitchen cabinets and I planned to try out chalk paint to see how easy it was to use and how well it might hold up in our kitchen over time.
My husband Phil and I were able to turn a profit on our last home, which allowed us to pay off our student loans (woo hoo!), have a down payment for our new house, as well as a reserve budget for immediate renovations. Since we were working with cash for this renovation, I wanted to be as careful with spending as possible. No going over budget allowed!
I would have loved to equip our kitchen with brand new, custom-made cabinets to fit the new footprint I designed for this space, but a more budget-conscious choice was to reuse our existing oak cabinets, rearranging them to fit the footprint and using spacers between cabinets where necessary. And, of course, you knew I'd want to paint it all white! We seem to be crazy for white kitchens here at A Beautiful Mess.
I have the unique perspective to be able to share two different methods of painting kitchen cabinets, since the last time I painted our kitchen cabinets, we used latex paint and a traditional method of sanding, priming, wet sanding, priming, and painting (all using a spray gun). It was A LOT of work! But this time around I wanted to try out a different method, mostly out of wanting less work, but also out of curiosity and a duty to the world to blog about the pros and cons of each method.
So, I decided to try Annie Sloan's Chalk Paint on our cabinets. And I have a lot to say about it! (You can scroll to the end of this post if you just came here for the pros and cons list.)
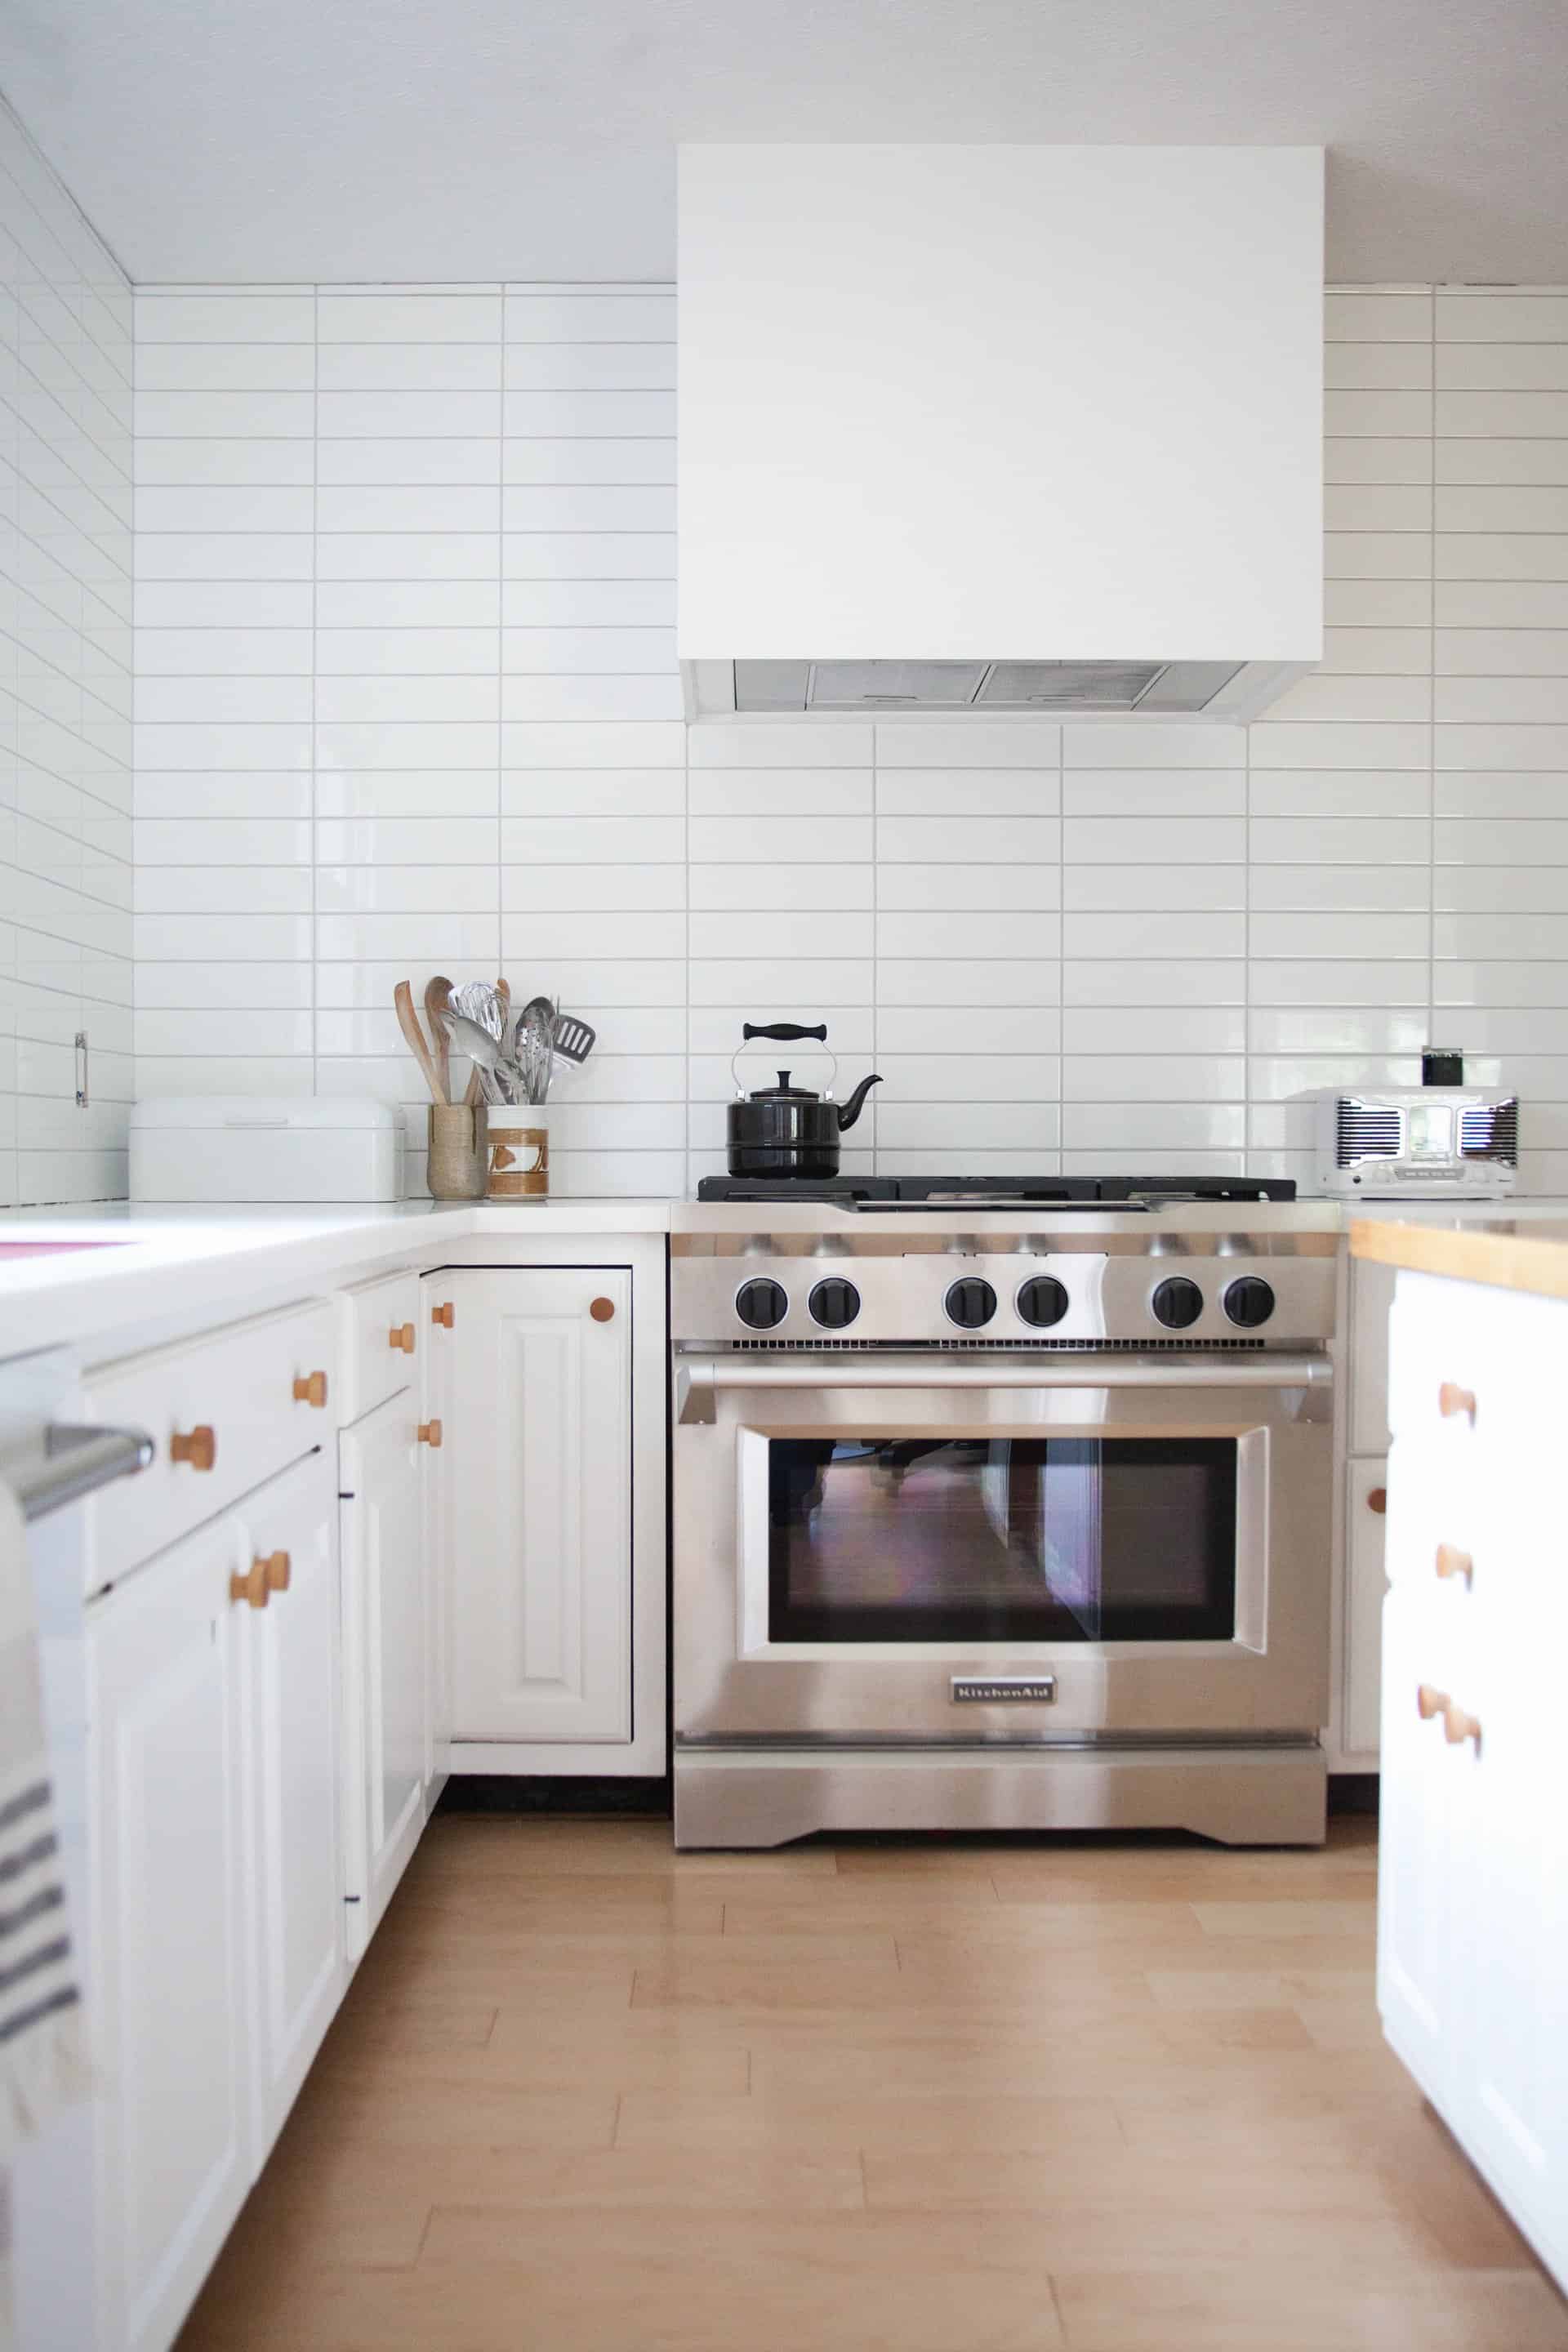
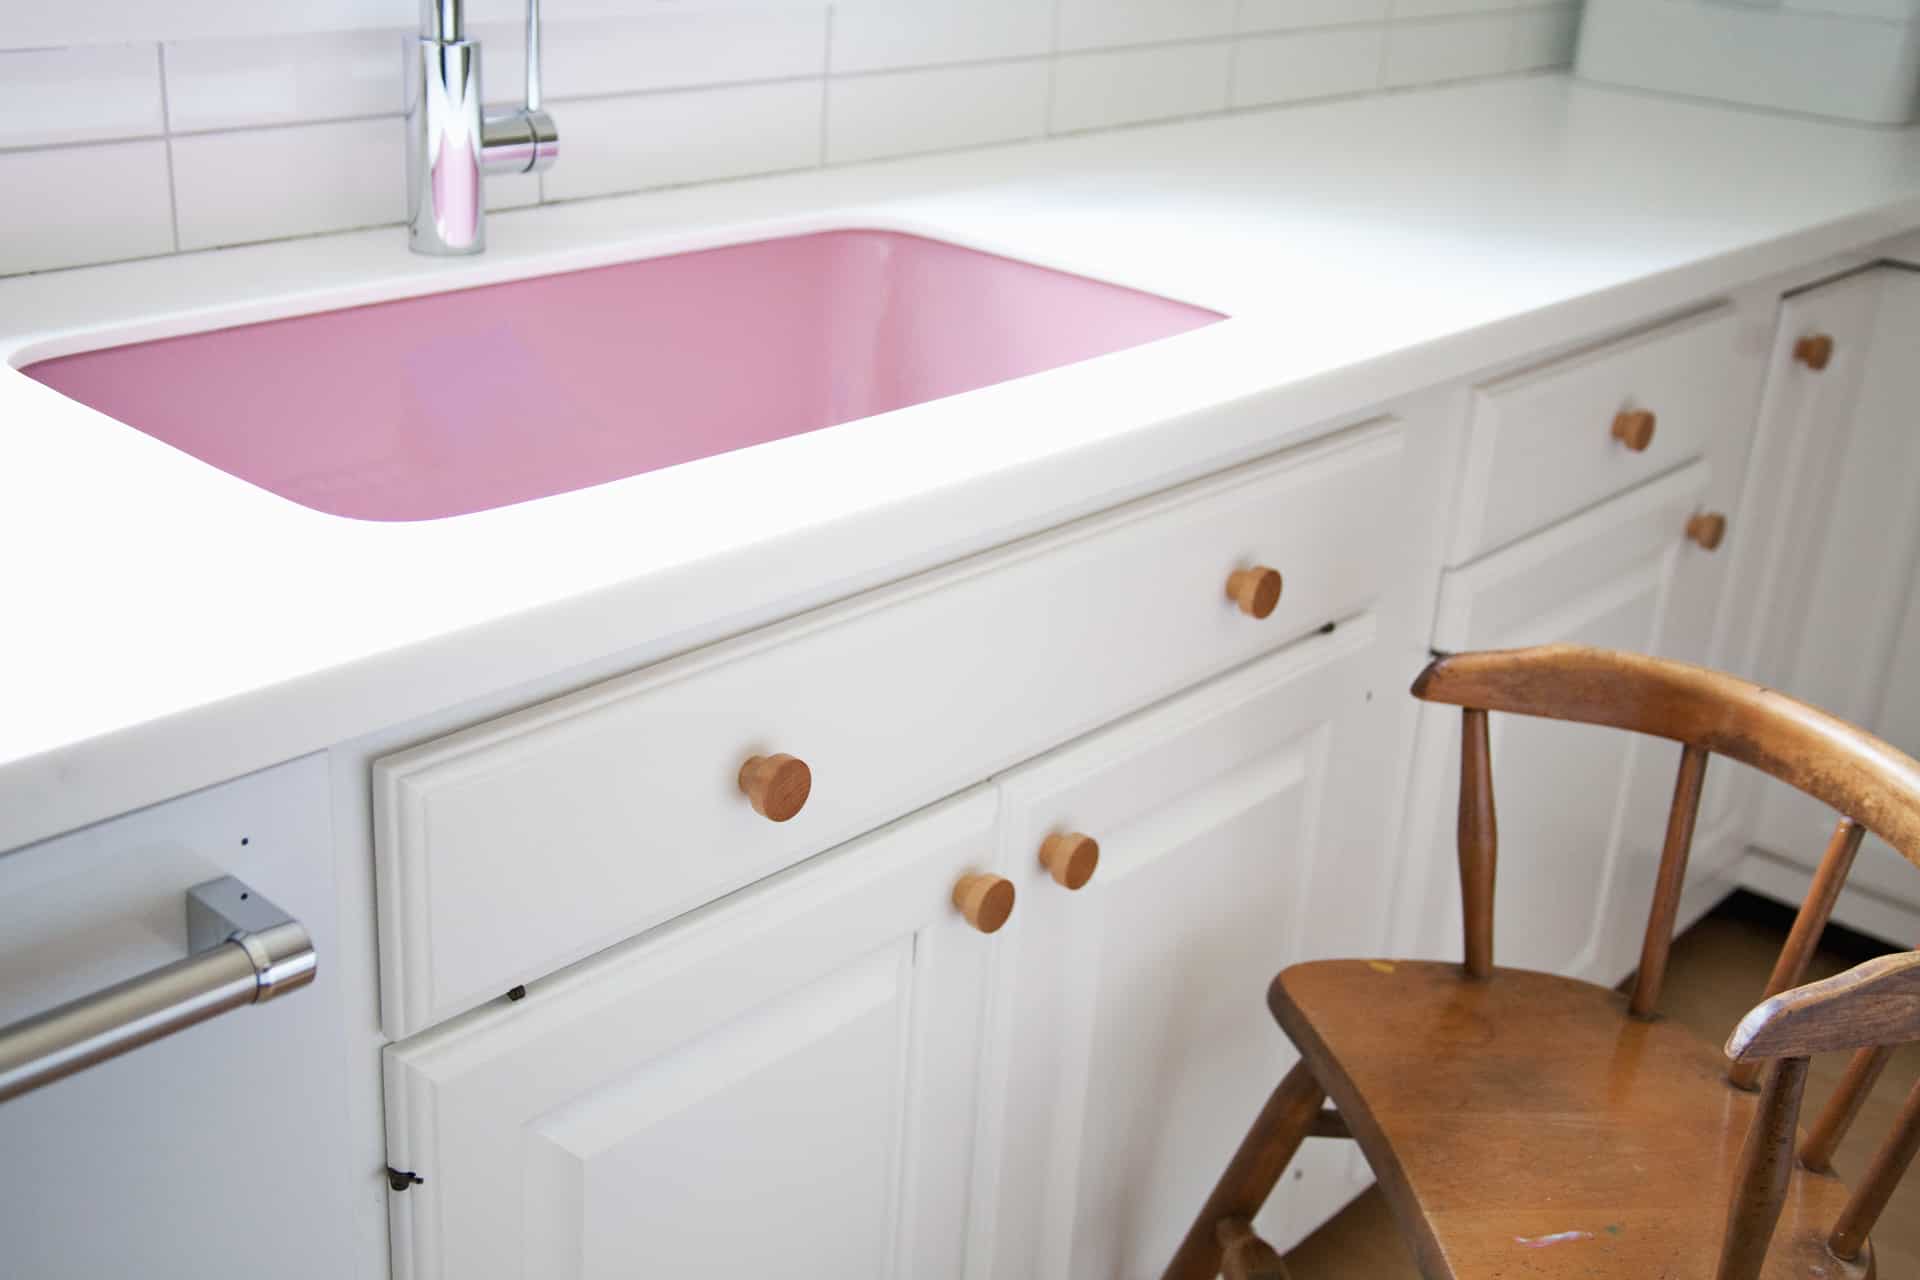
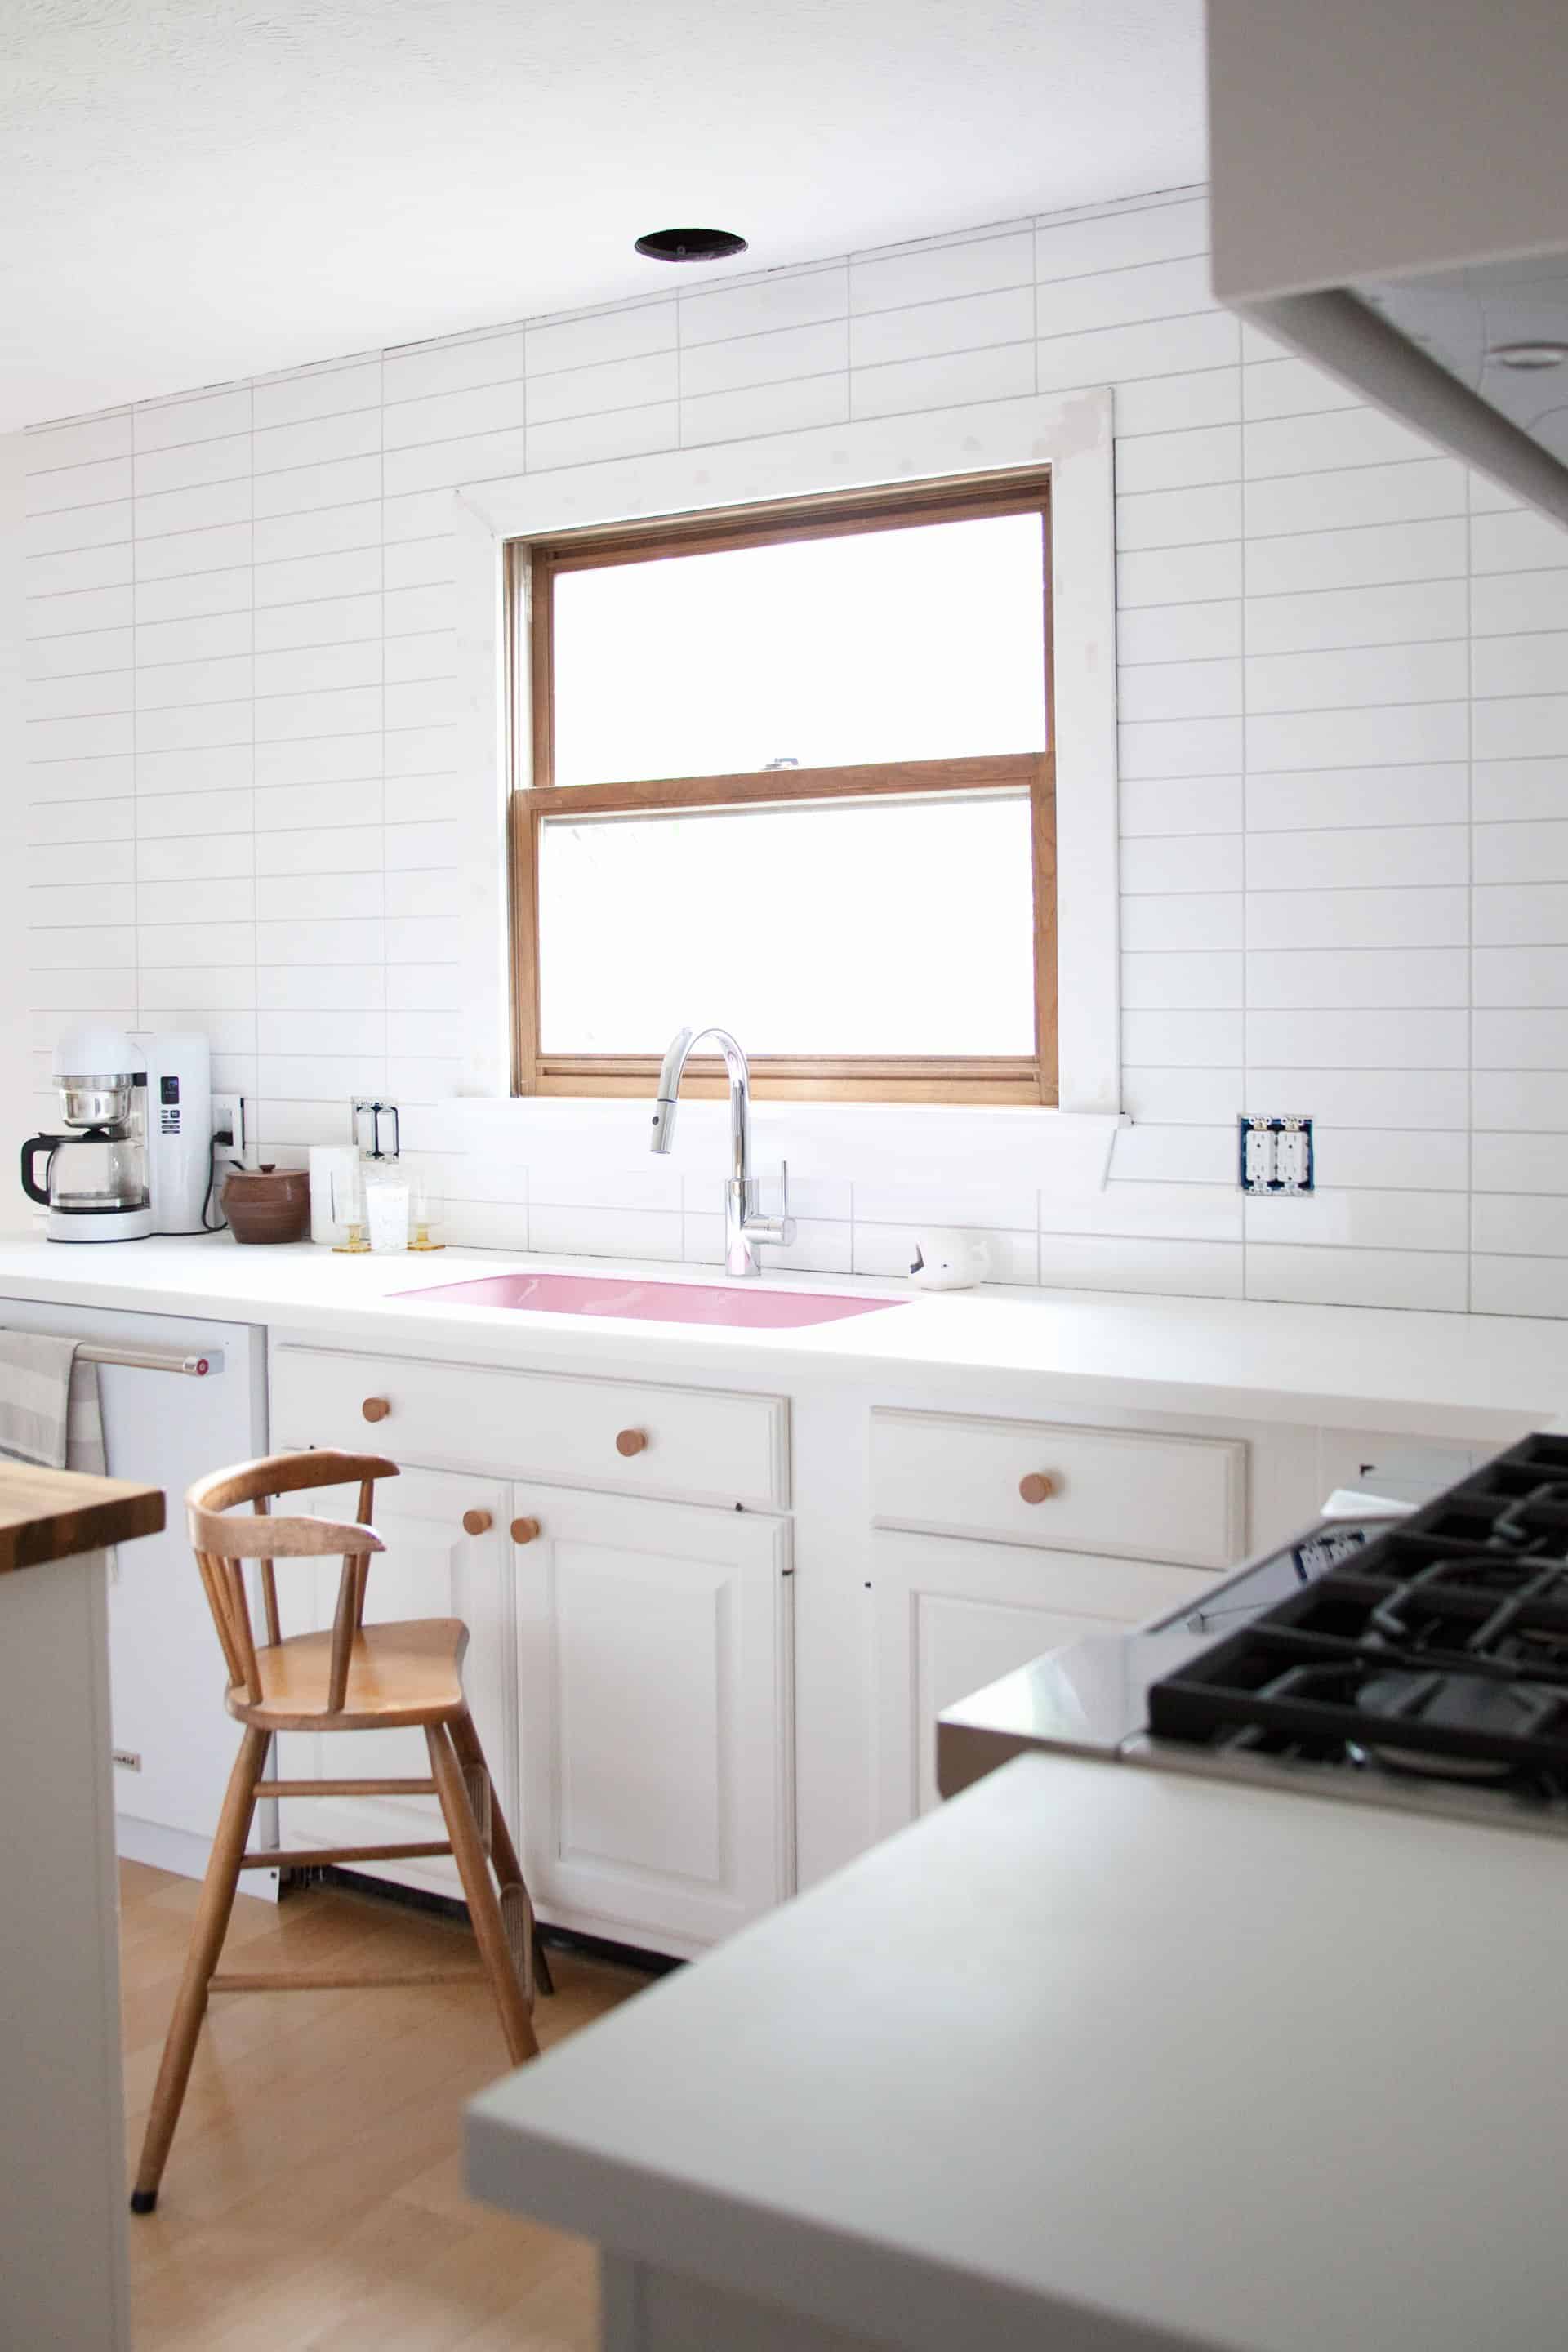
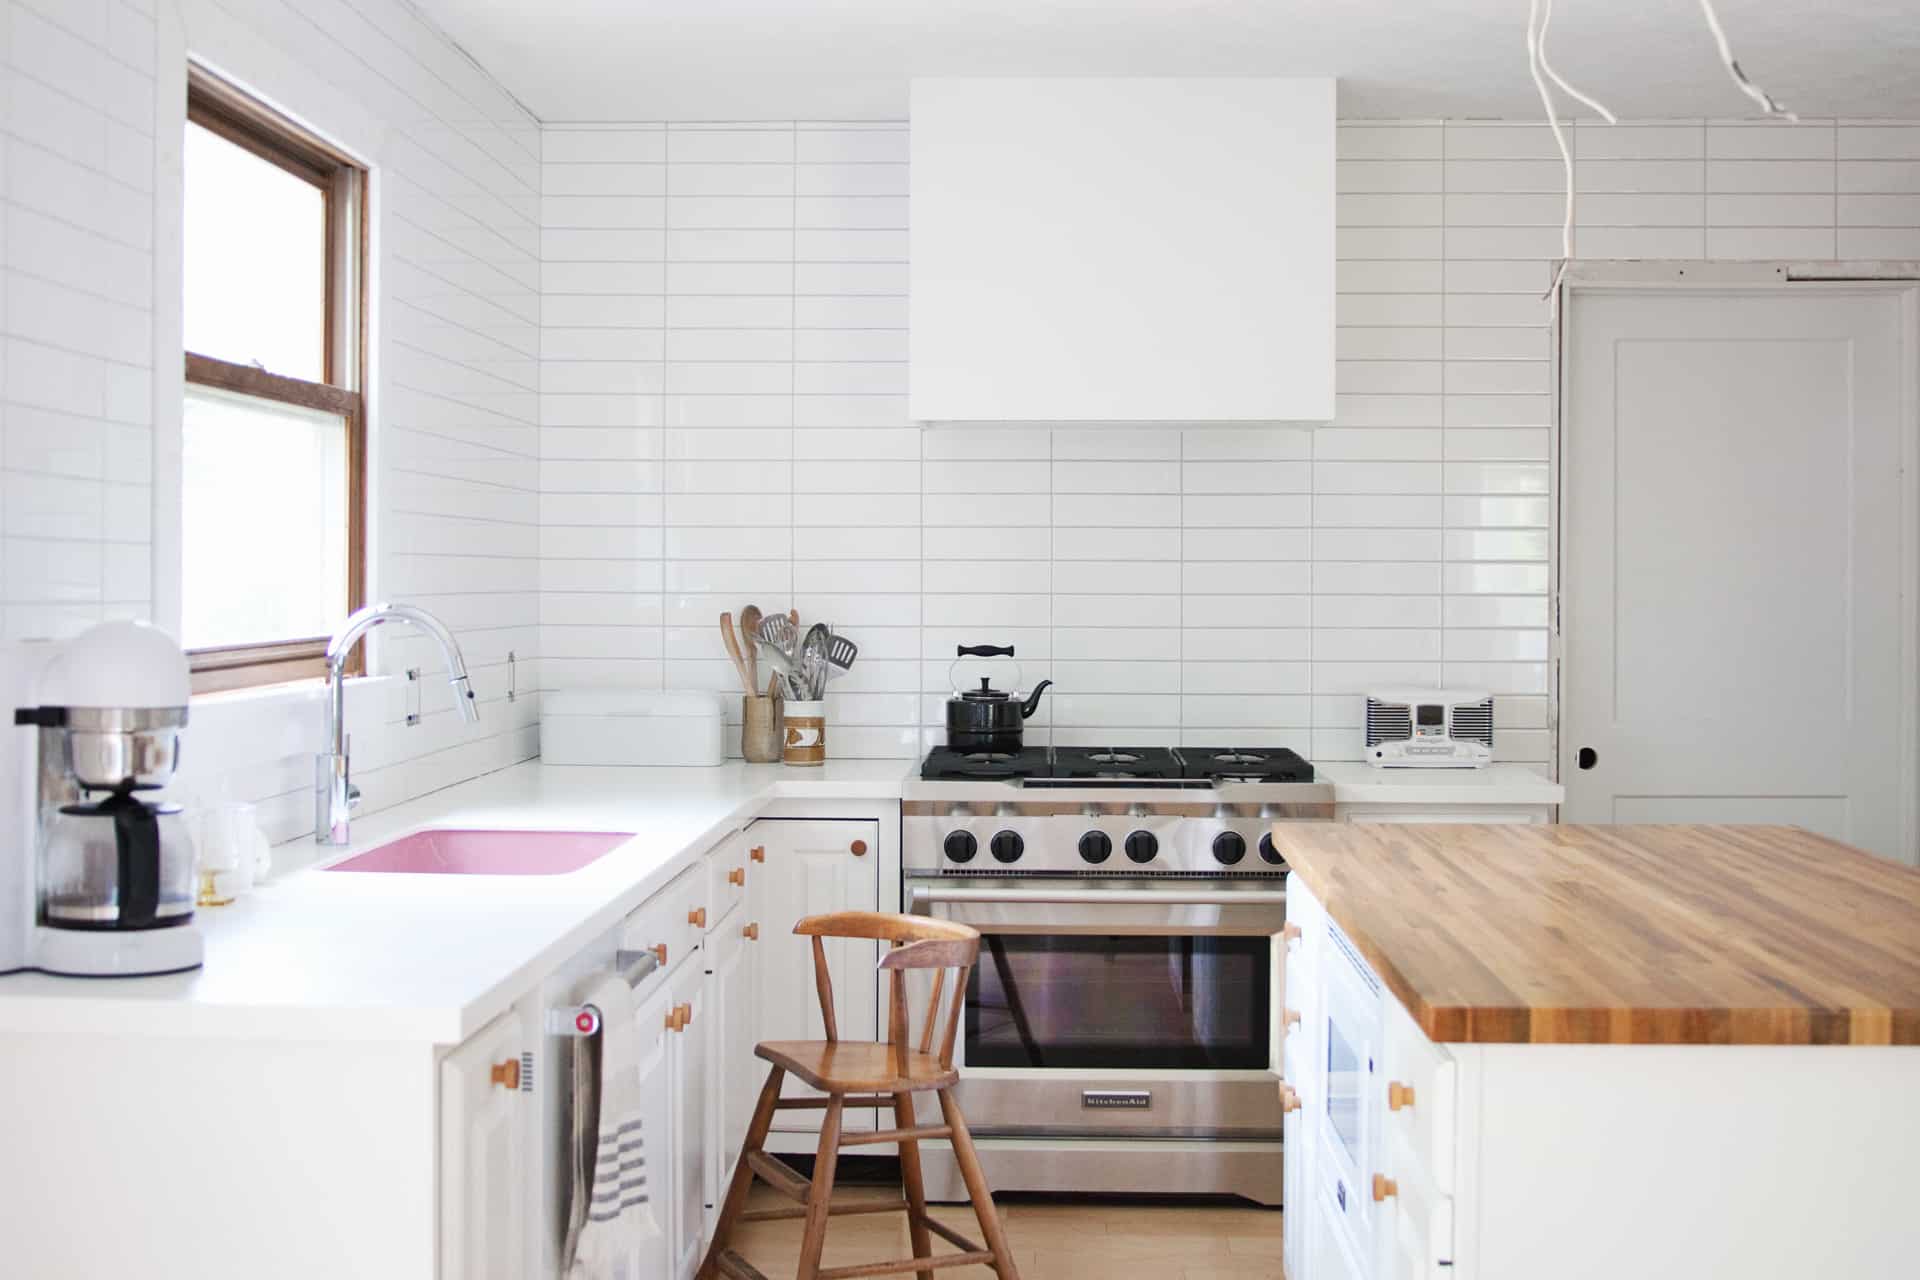
 This is how our stove wall used to look before rearranging the cabinets to move the stove here, giving more space to the dining area of the kitchen. We discarded the old countertops and are relocating the upper cabinets to the basement and garage. Our new countertops are Corian Solid Surface in Arctic White, and we made the countertop of our kitchen island bigger so we can eat here, too. We outfitted it with the same countertop we had used in our last kitchen renovation—a maple butcher block slab we sealed with Waterlox, like we did here.
 ABOUT CHALK PAINT
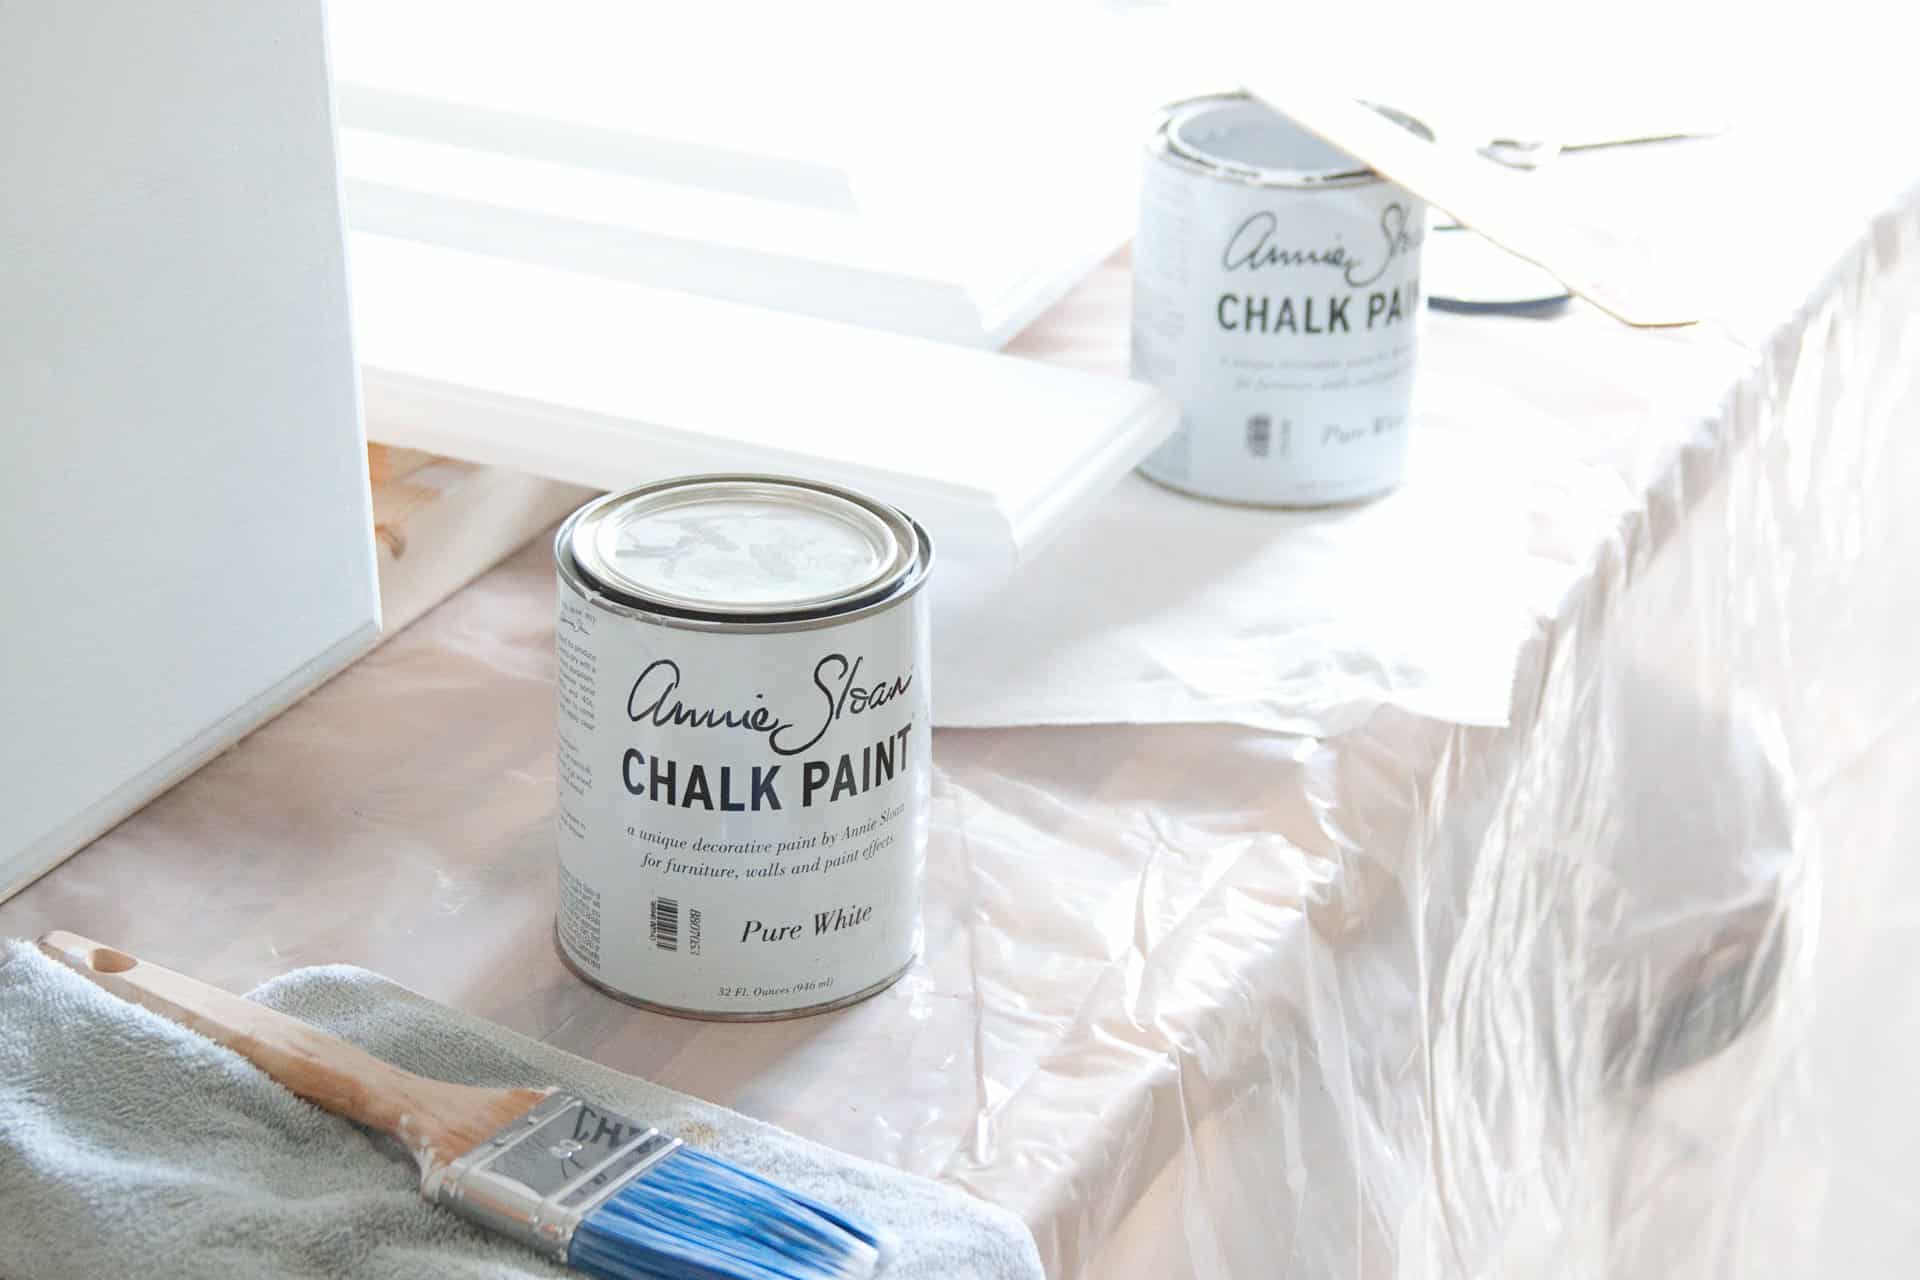
Chalk paint is different from chalkboard paint. Chalk paint is a specially formulated flat paint that will stick to almost all surfaces without sanding or priming. It has a matte finish and needs to be sealed. Other brands have formulated their own versions of chalk paint, but Annie Sloan is the original. I used their Pure White paint, and it really is a neutral white without warm or cool tones to it.
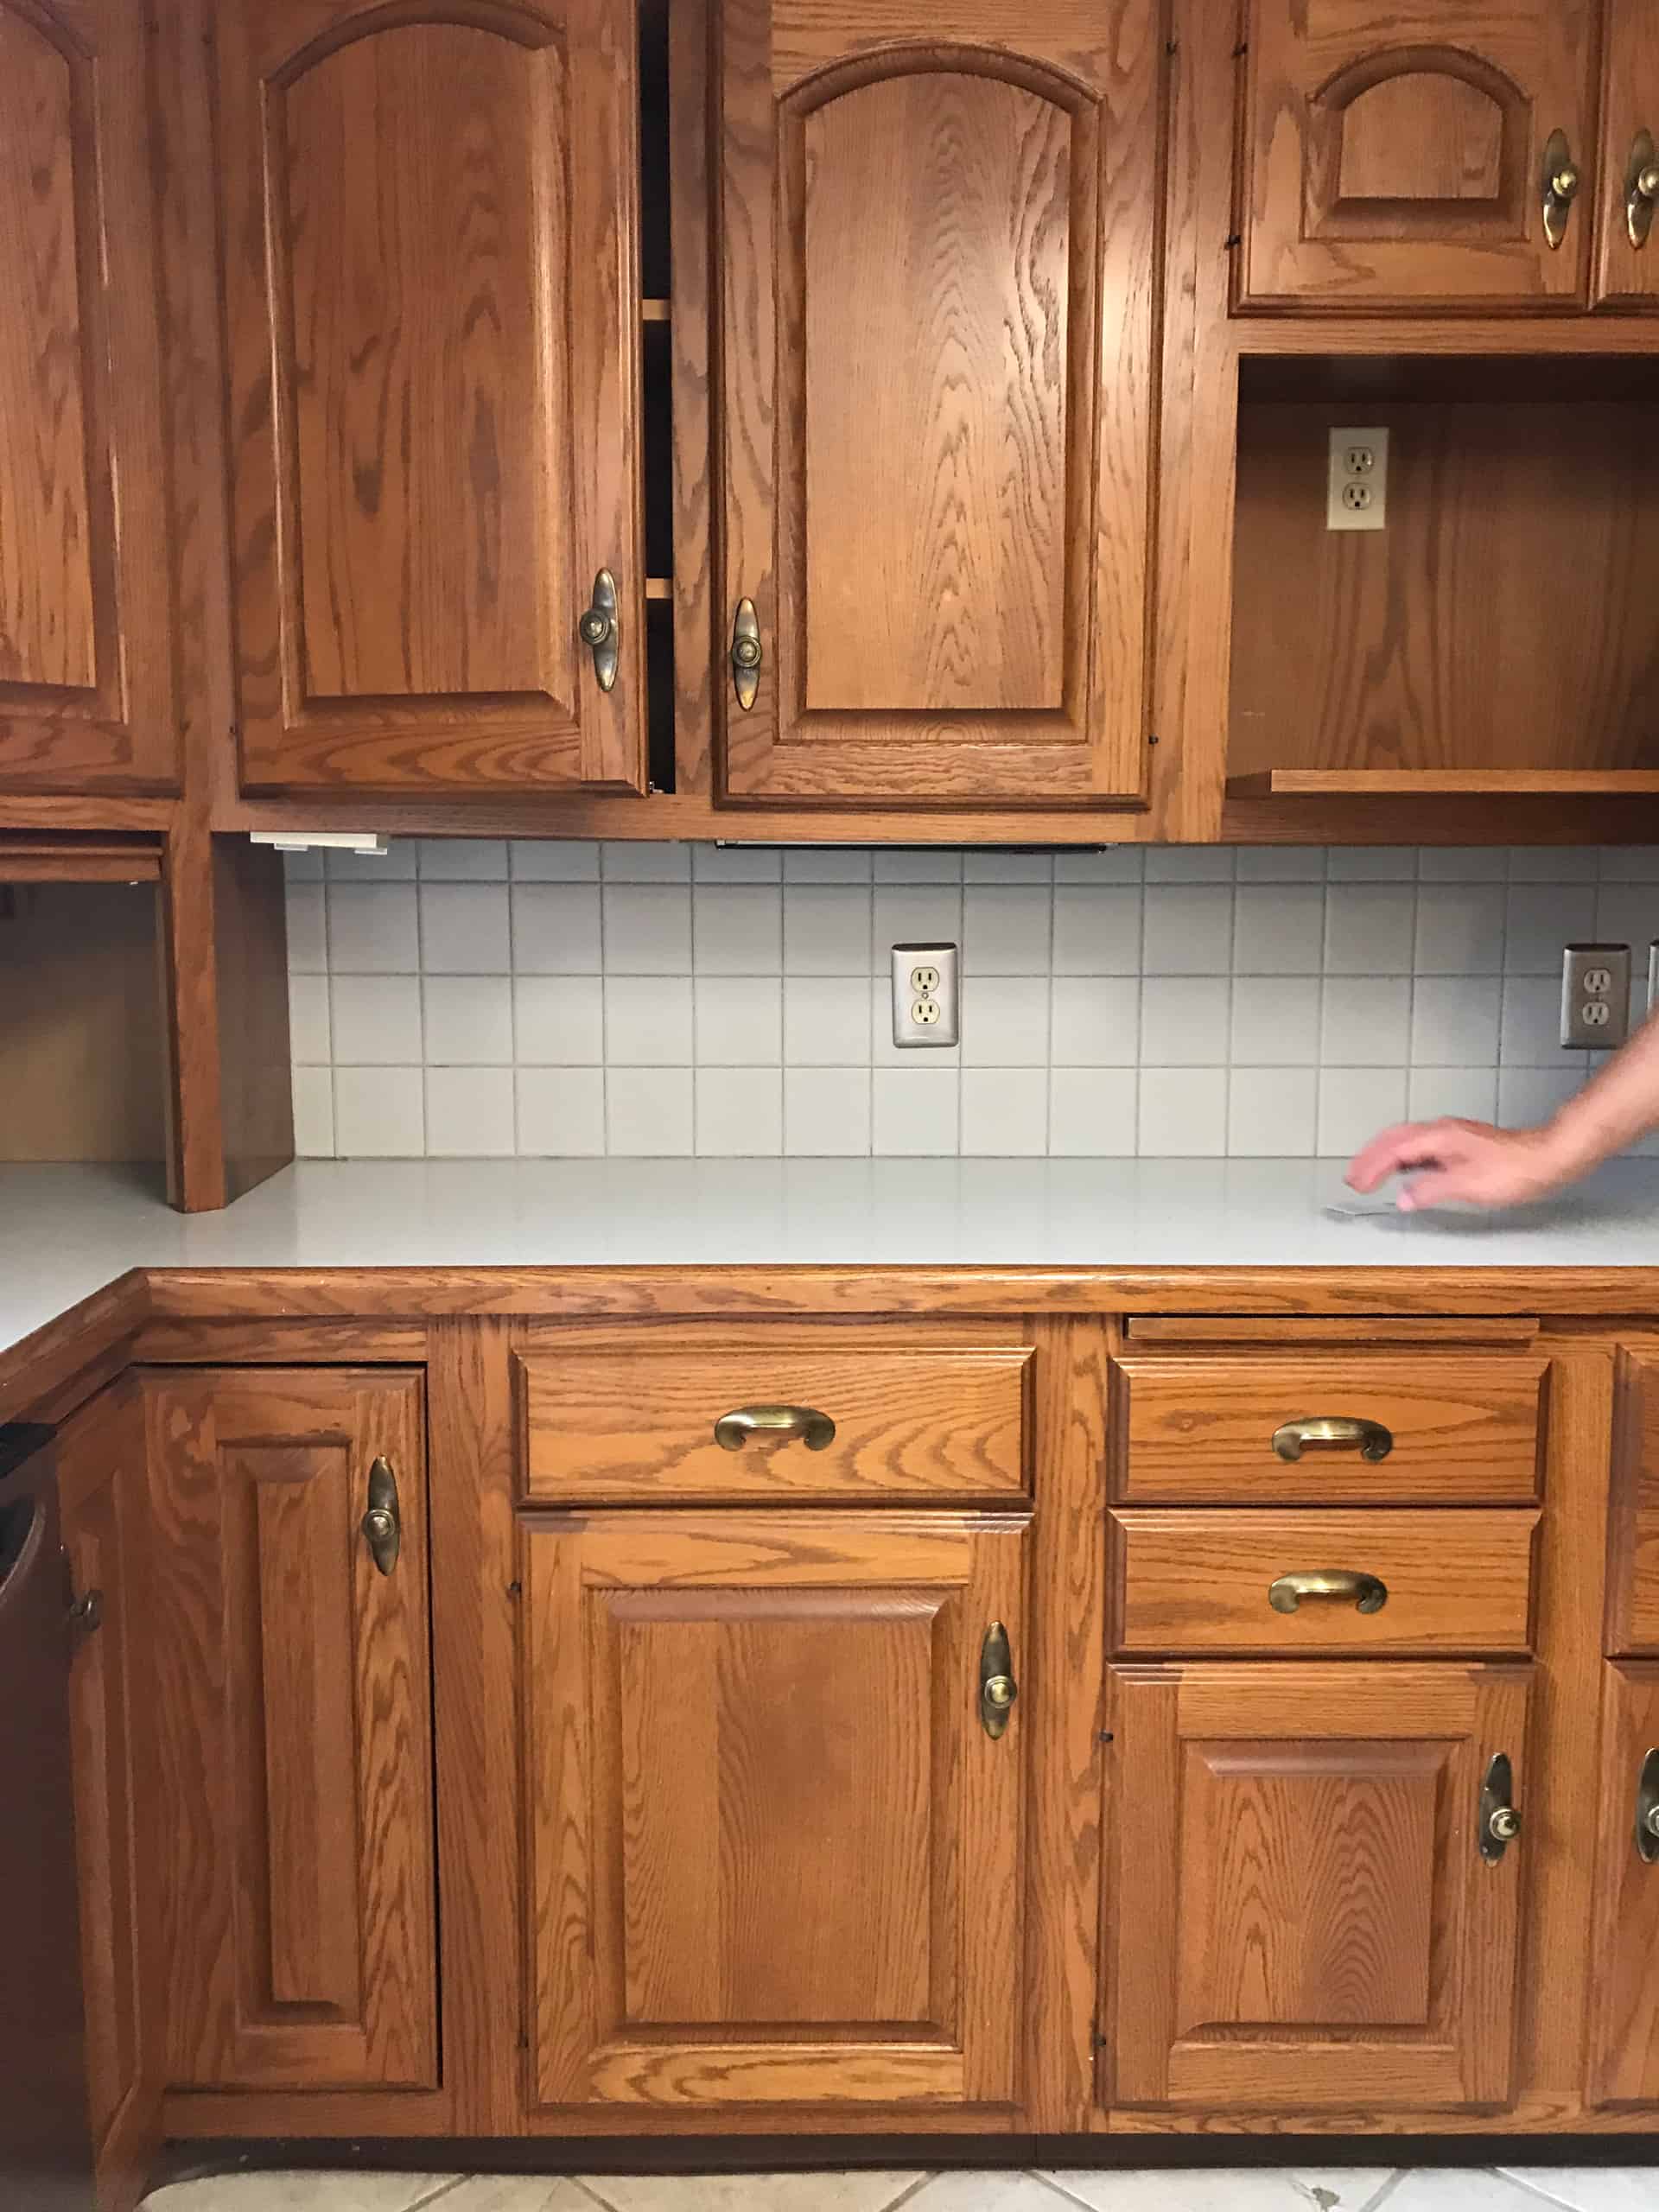
 First, I thought I should show you what our kitchen looked like when we first got the keys to the house. We completely removed all of the cabinetry on the right wall, and I'm working on building a shallow shelving system to go in their place, in order to make more room for seats at the island and around the dining area. We moved the stove to the far wall, to make more room in the eat-in area of the kitchen. This required running a new gas line to power the stove (the old stove was electric) as well as rerouting ventilation for the hood vent.
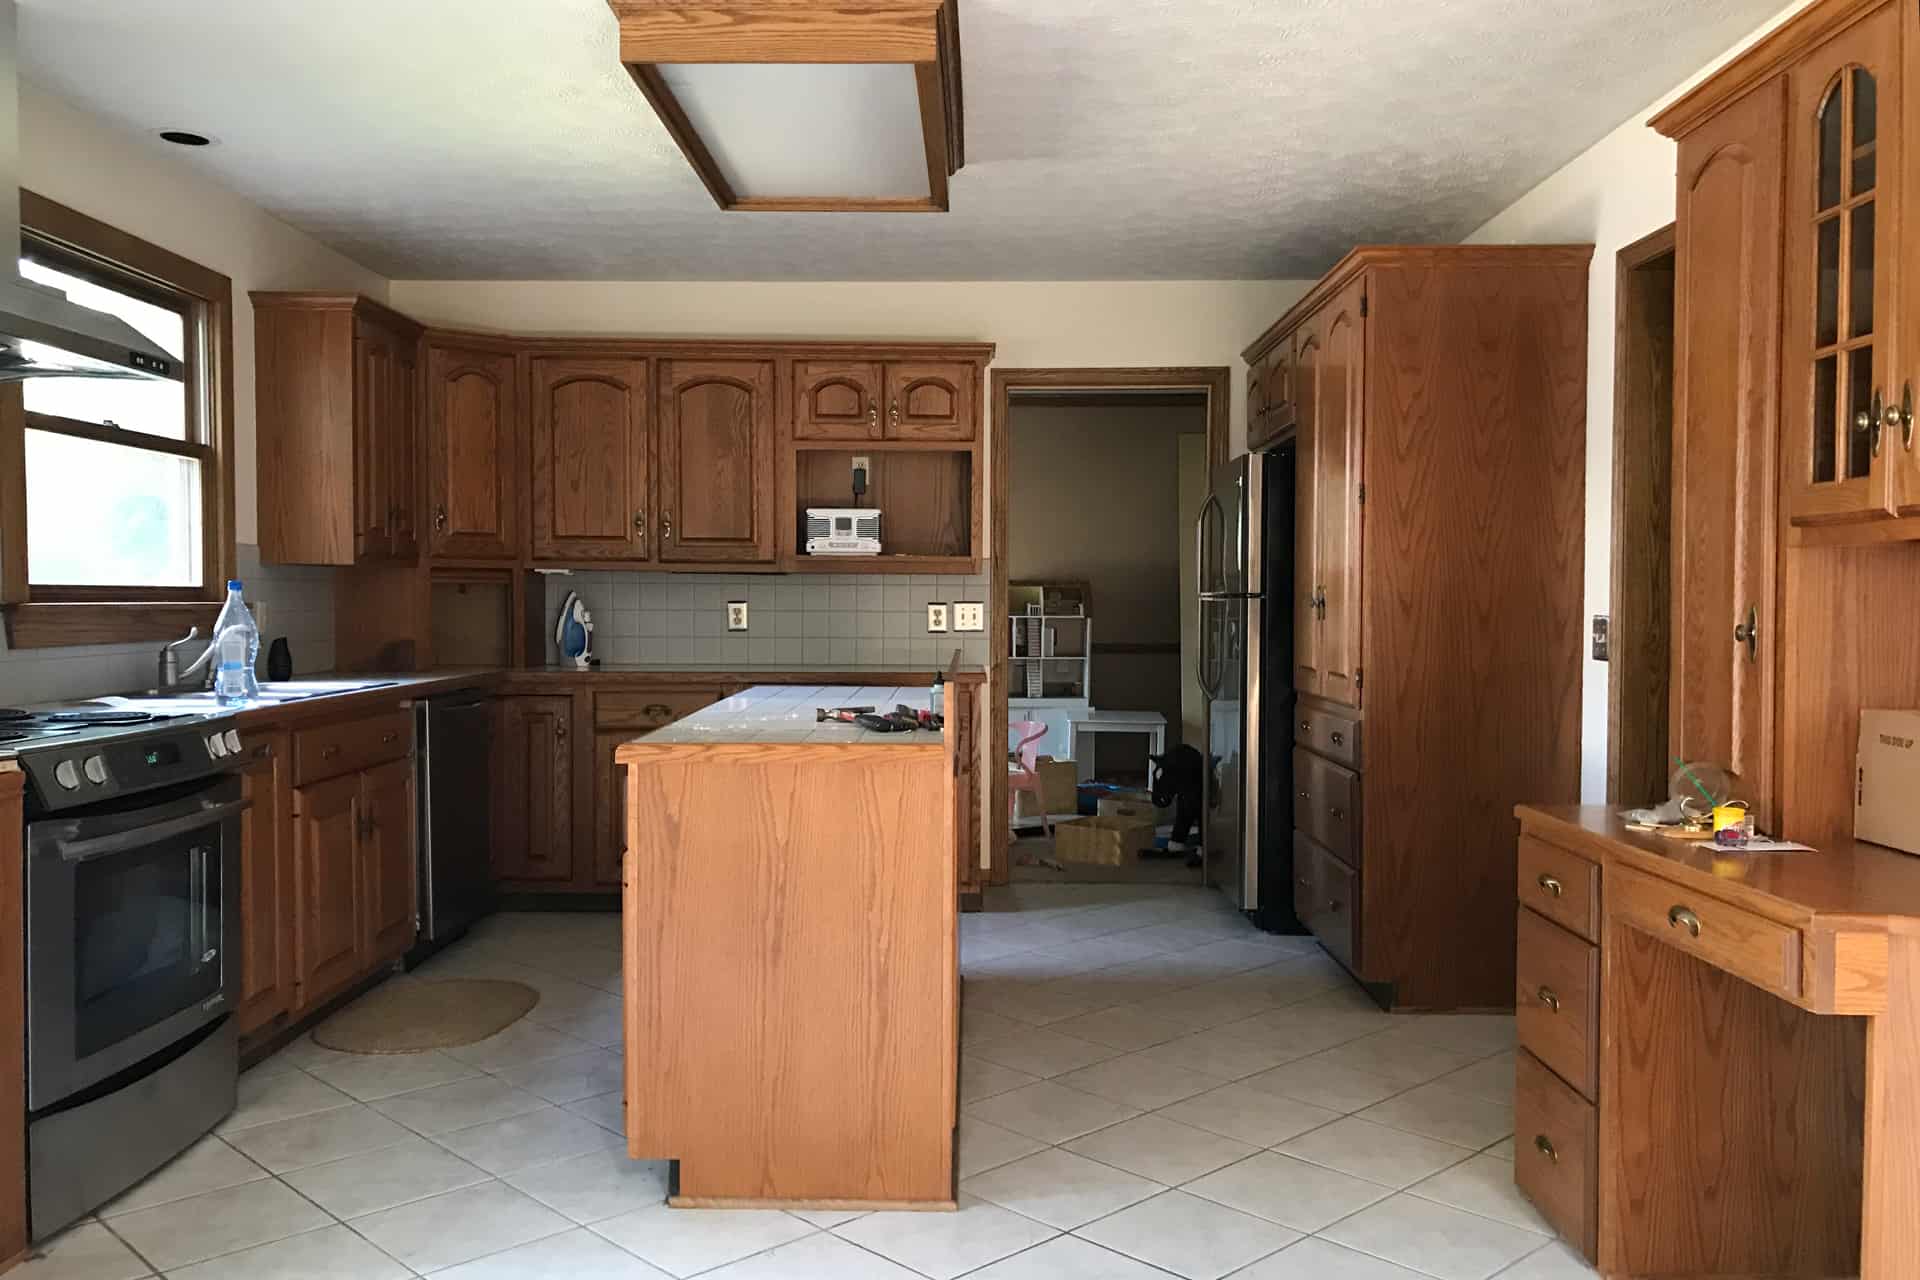
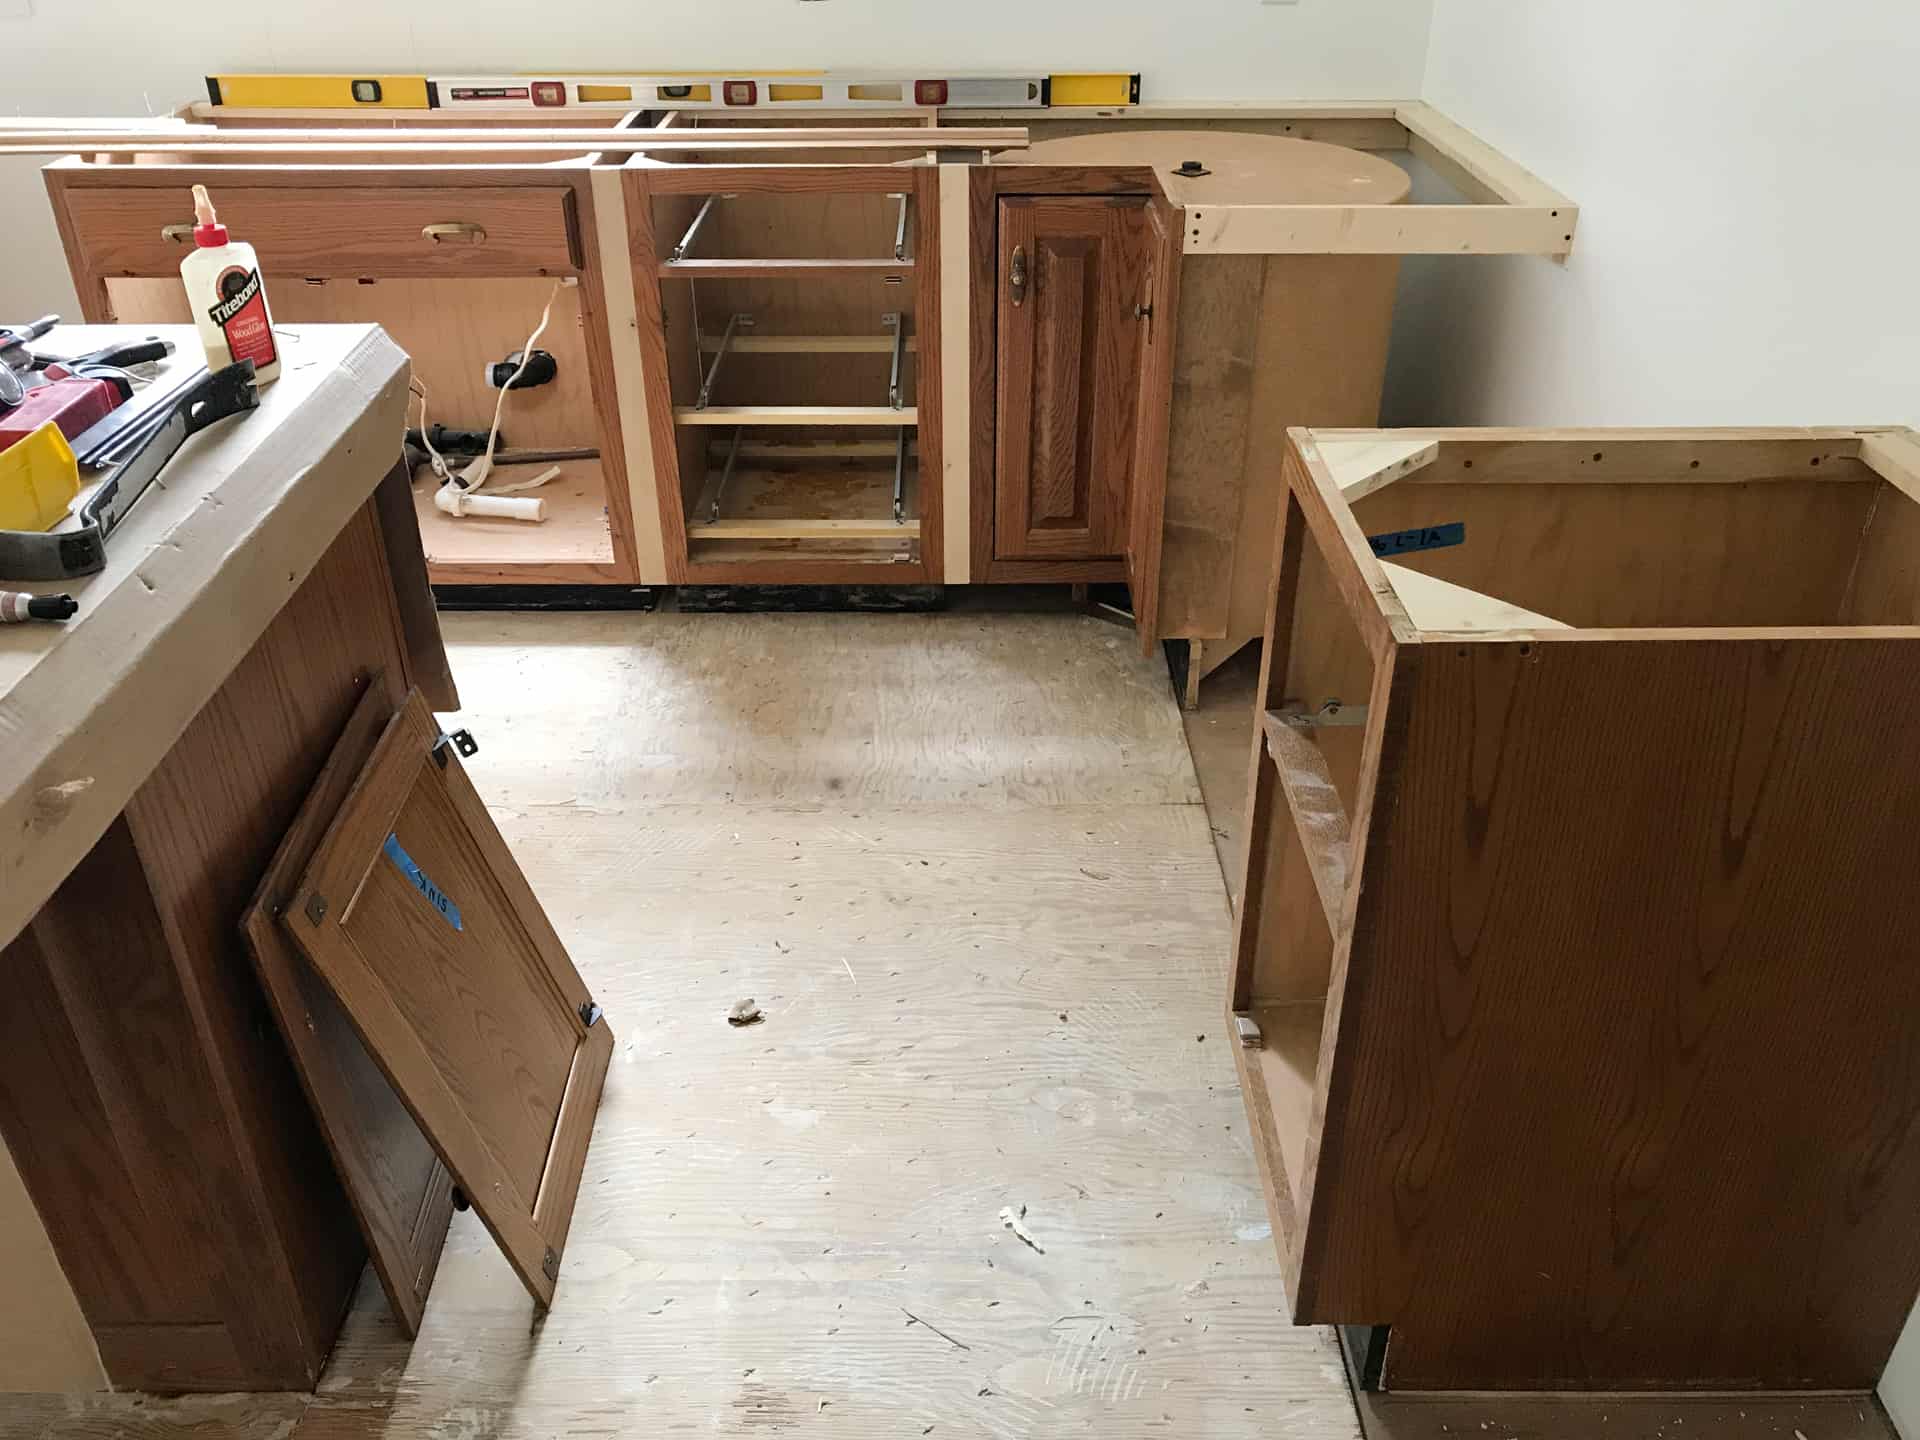
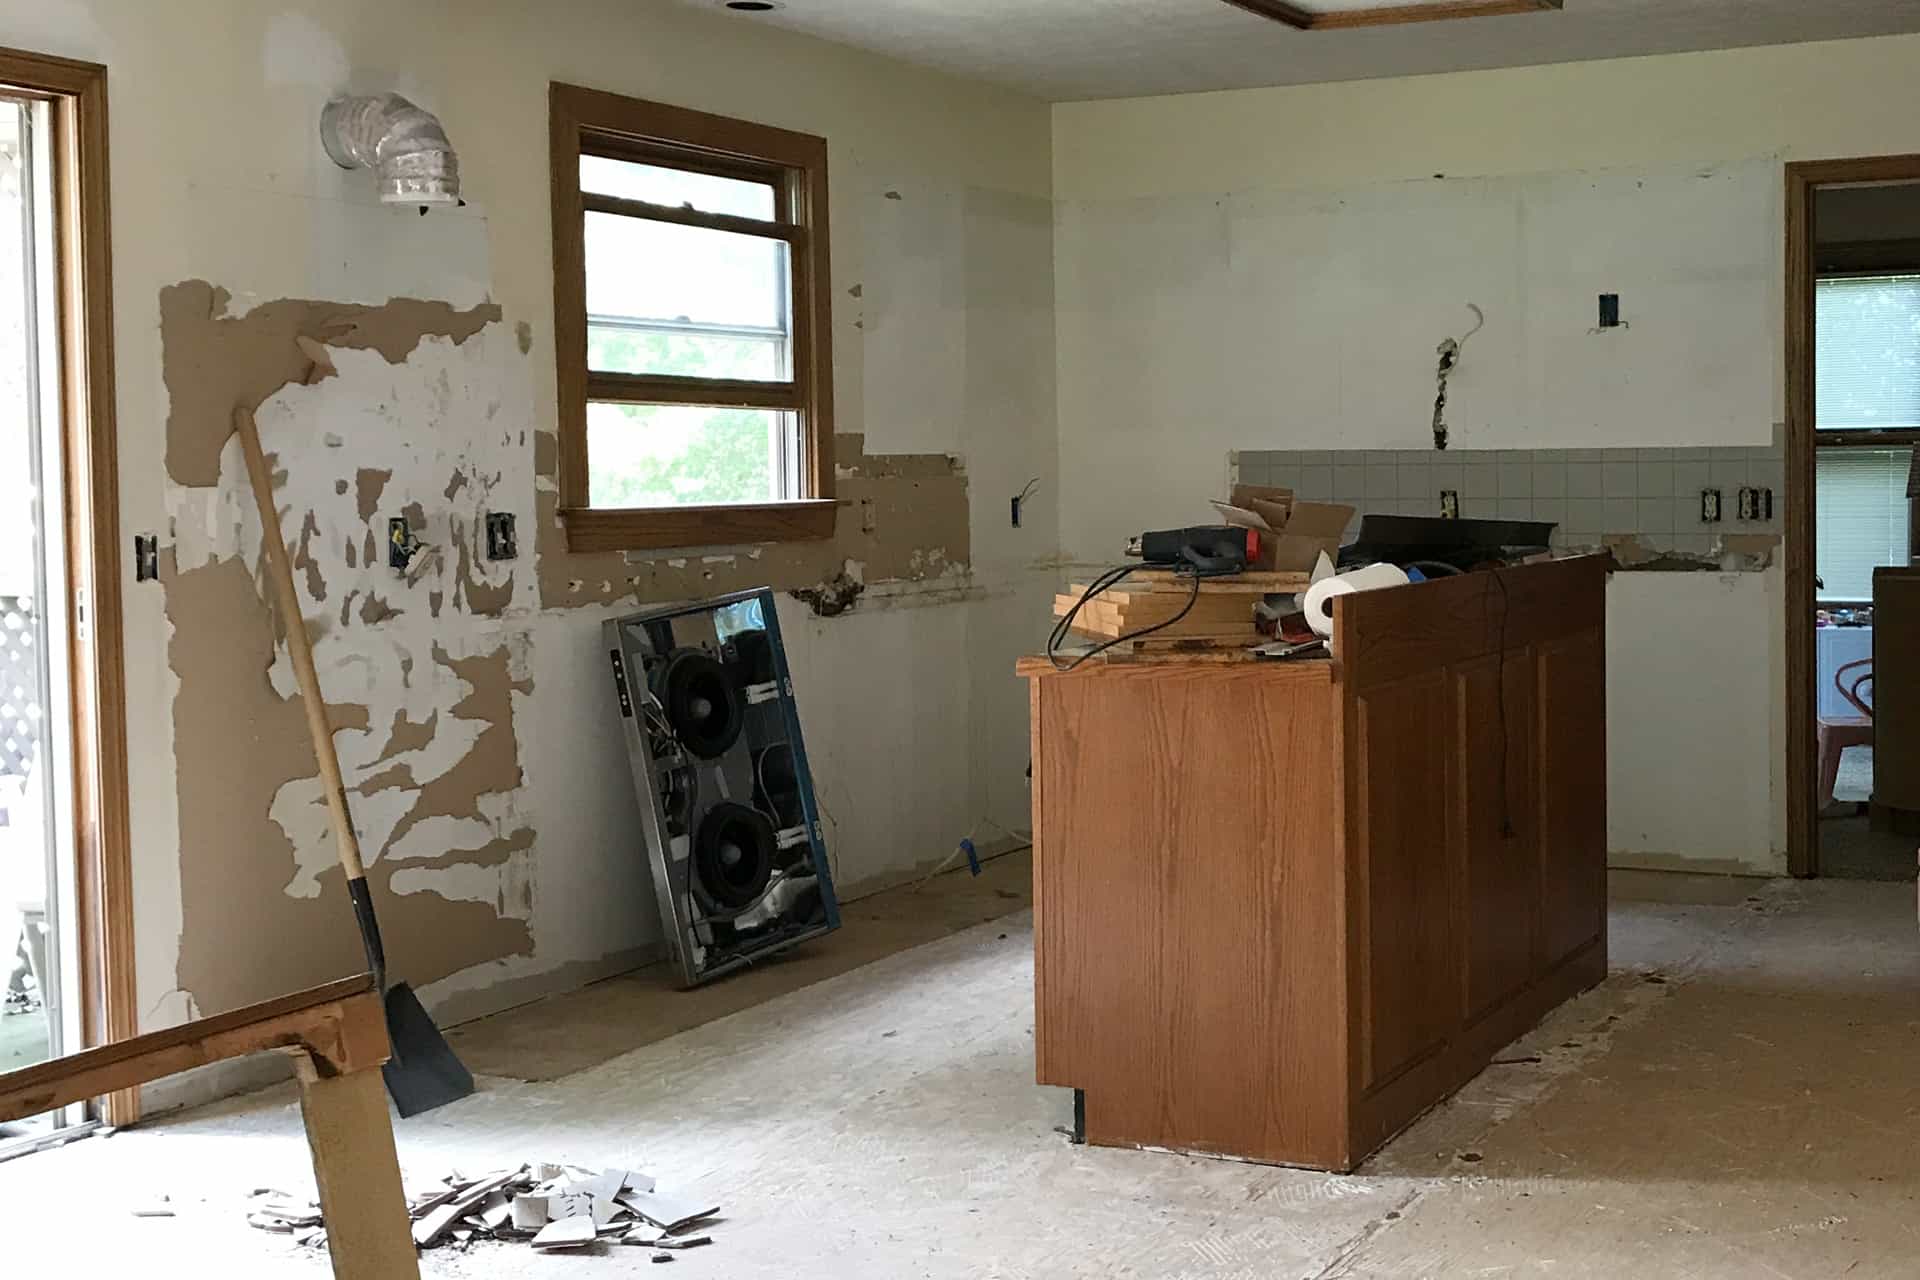 First, we pulled everything out. I had rearranged all of the cabinetry digitally on AutoCAD first to make sure I could get the footprint I wanted without physically rearranging them in place. There was one spot we had to glue in wood spacers because I didn't have a cabinet wide enough for the space and didn't want to go through the trouble of fashioning a new (albeit useful) narrow cabinet to fill the gap.
 FILLING OLD HARDWARE HOLES
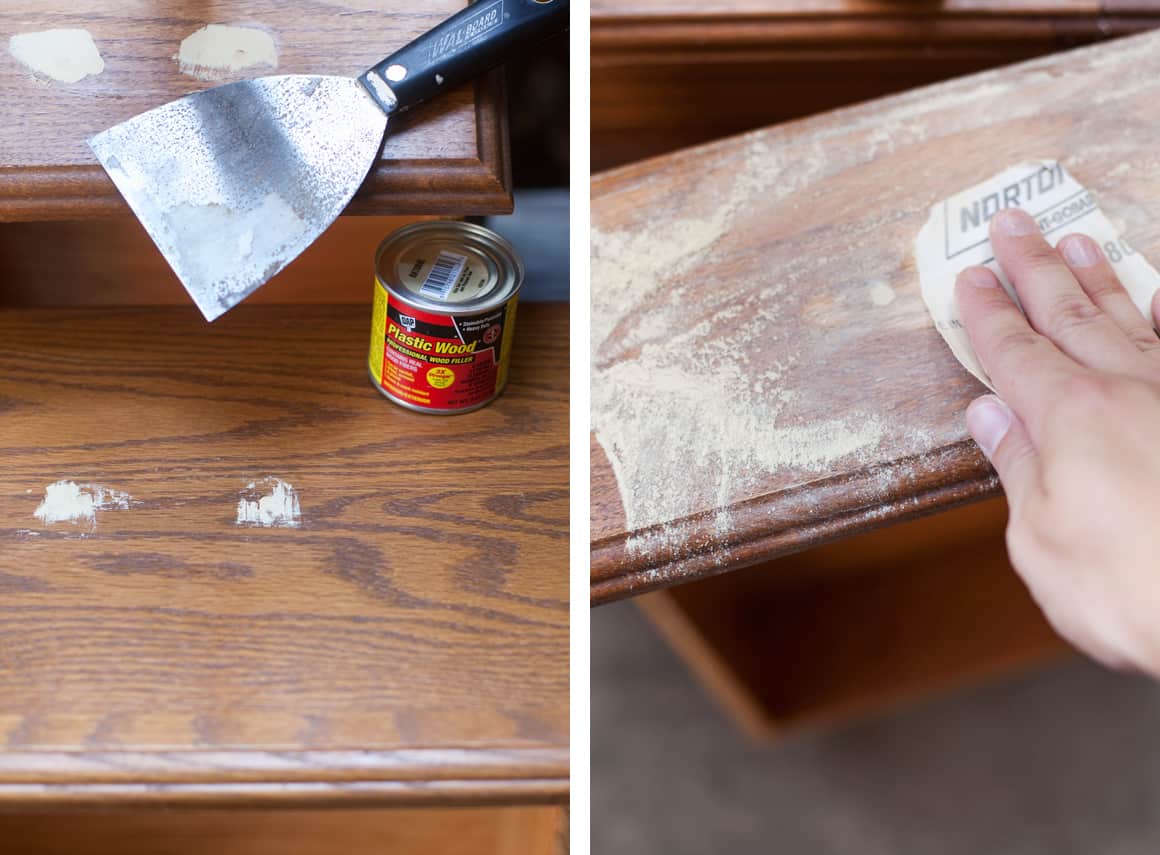
Next, I removed the hardware from the doors and drawers, and filled the holes where the drawer pulls and door knobs used to be, since we planned to use new ones with different attachment points.
To fill the holes, I used Plastic Wood brand wood filler, which dries within 15 minutes. So you have to work quickly, but you'll also be ready to sand it smooth without waiting for too long.
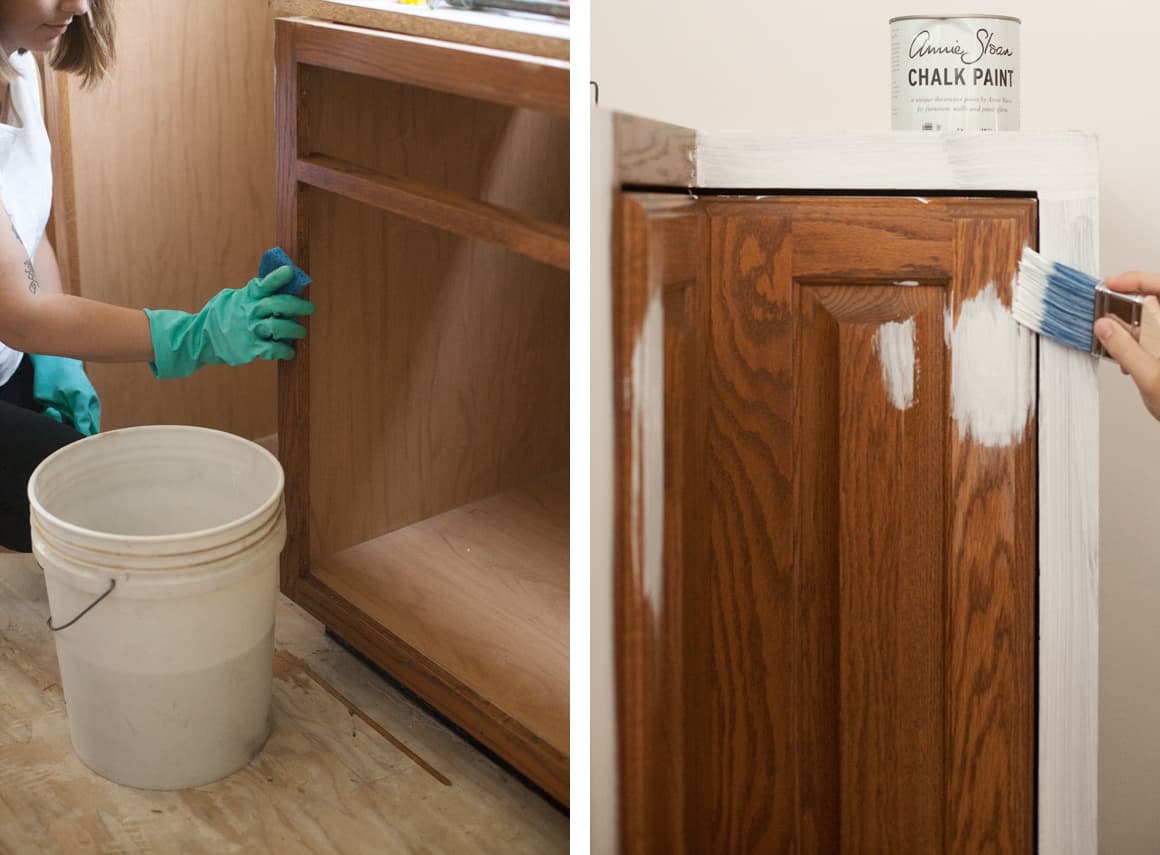 The most important step of painting your cabinets is cleaning them very well first. Use a degreasing detergent in your water and a non-scratch, yet abrasive pad (something you might use to clean a non-stick skillet), and really scrub hard! I thought I had cleaned my cabinets very well, but after painting, I noticed a few grease dots that were showing through the paint.
I had to cover those areas with more than 10 coats of paint for the grease spots to stop finally showing through! Even primer wasn't working to cover up the grease. So, please take it from me—make sure your cabinets are super clean before painting.
After rinsing and drying the cabinets, I began painting with the chalk paint, without sanding or applying a primer.
 PAINTING AND SEALING
I was surprised at how thick the chalk paint went on, and how quickly it dried. I was able to paint a coat, and immediately begin another. It took three coats to cover everything, and while it has the oak grain, there was the texture of the brush left on the surface, so I lightly dry-sanded it with 600 grit wet/dry sandpaper.
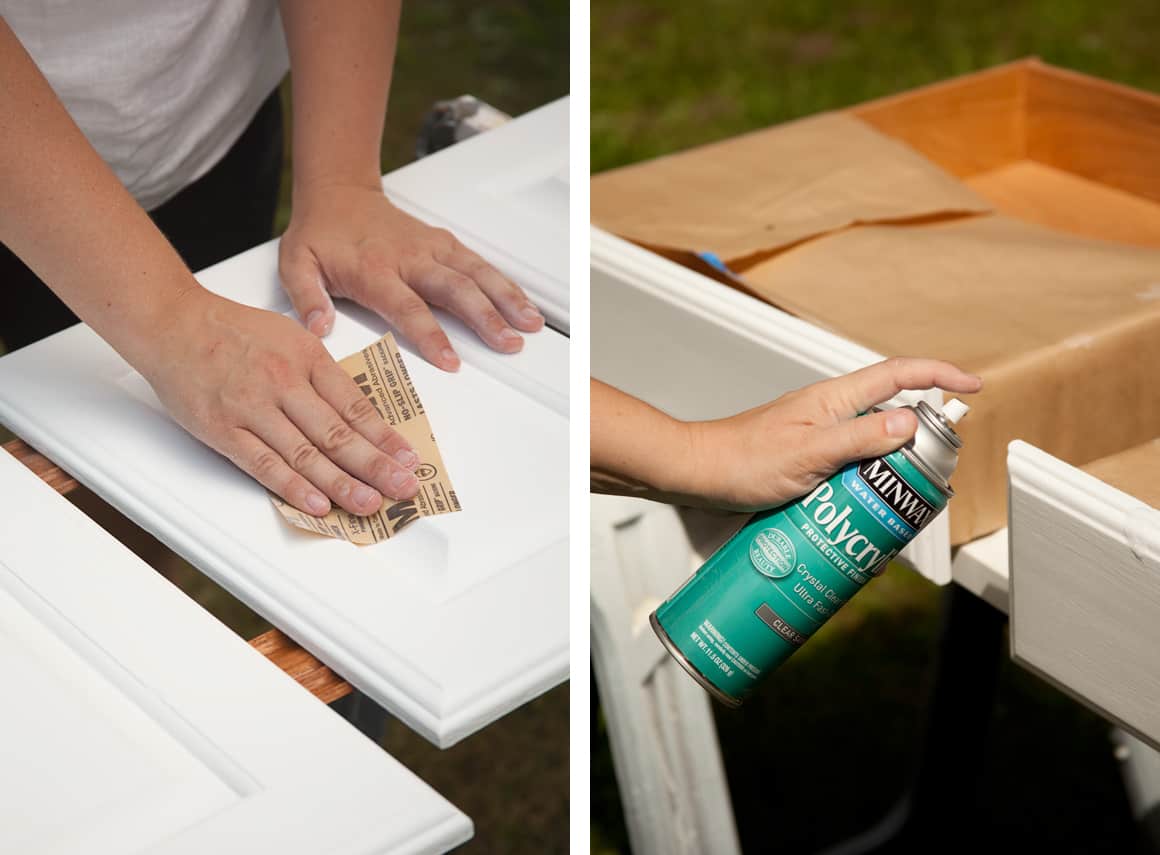 After the light sanding, the paint finish was so silky smooth—you'd never know there was oak underneath! Traditionally, chalk paint is finished with wax, but because kitchen cabinets receive such heavy wear, I wanted to use a finish that wouldn't need maintenance.
My go-to wood sealer is polyurethane, but it's a finish that notoriously yellows. Not the look I want with white cabinets. So, I used a water-based Polycrylic instead which doesn't use urethane as a hardener, so it won't yellow over time.
I brushed three coats of Polycrylic onto the cabinet bases, and sprayed three coats onto the doors and drawers. It took two 1/2 pints to cover the cabinet base and island, and three bottles to spray the doors and drawers.
 FINISHING TOUCHES
I used the original hinges on all of the doors, but replaced the hardware with these little wooden knobs that had a modern silhouette. They came unfinished, so I used Minwax Natural Stain and sealed with a few coats of polyurethane. I used polyurethane rather than Polycrylic, because it isn't water-based and will stand up to being wiped and handled constantly, while I am a bit concerned about how Polycrylic may possibly become tacky after years of wiping and handling.
PROS AND CONS
Now that I've finished all of the painting, and because I've done it before a different way, I thought it would be really valuable to share a pros and cons list for each process—latex paint versus chalk paint.
CHALK PAINT PROS:
- Chalk paint dries quickly.
- Chalk paint is thick and requires less coats of paint.
- There's no need to prime.
- If painted over already sealed wood, tannins of the wood will not seep into the white paint, causing brownish stains.
- Chalk paint will hide heavily grained wood like oak.
CHALK PAINT CONS:
- Chalk paint is thick and leaves brush marks. (Latex paint will also leave brush marks, but last time I used a spray gun for the latex paint.)
- You can't have custom colors mixed with Annie Sloan paint, though you are encouraged to mix them yourself. But this requires you to have extra on hand for touch-ups.
- It is hard to hide the tannins when painting over areas that have been freshly sanded and not sealed, like the areas around the hardware holes I filled. These areas required a few extra coats of paint, though primer may be more efficient at doing this.
- Because of the thickness of chalk paint, it can build up quickly and diminish the dimensionality of decorative routered edges.
- Chalk paint can't be brushed on as evenly as latex paint can be sprayed on. Some edges of my doors and drawers have thicker coats of paint and almost globby areas, though I was careful not to put it on too thick.
LATEX PAINT PROS:
- The paint finish will be very smooth and even, if done the proper way. (Check out all of the steps I did to achieve the perfect finish for our last kitchen renovation.)
- Latex paint is relatively inexpensive, and a little goes a long way when spraying.
- You can have your paint color custom mixed and if you need more paint mixed for touch-ups, you can purchase the exact color of paint again at a later time.
- You do not need to seal latex paint, and a satin or semi-gloss finish is easy to clean.
LATEX PAINT CONS:
- Spray painting requires a lot of extra tools. Renting or buying them is expensive, and even if you own them, it is tedious to set up and clean up.
- Latex paint requires all cabinets to be sanding and primed. If done right, you will prime, wet sand, then prime again, which is very labor intensive. Sanding also requires more materials, therefore more expenses.
- If spray painting, you will need a large area to lay out all of your cabinets and shelves, and will have to protect a large area around your workspace because of overspray.
- If you are painting over raw wood (especially oak), you may have some trouble covering the tannins which cause brown staining in your finish paint. Chalk paint can be done over already sealed wood, which takes care of this problem.
- Latex paint is not great at hiding wood grain. You will need to do extensive priming and wet sanding first to accomplish this.
CONS FOR BOTH LATEX AND CHALK PAINTS:
Time: Both painting methods are time intensive. I had thought chalk paint would be faster, because it had less steps. No wet sanding after priming and then priming again to tough up after wet sanding. But brushing on chalk paint was time intensive, and I could never get it quite even, like you can with spraying.
Spray painting latex paint was much faster, though it requires more coats, since you thin the paint before spraying, and spray it on lightly. Also, I think all the sanding I did for our last kitchen was much easier then it would've been this time, because those cabinet doors were flat, whereas these ones have routered raised panels that would have been tedious to sand.
Paint chipping: I've had experiences so far with both types of paint chipping off if you are rough with it, such as knicking it with a sharp metal object. I don't think the lack of primer contributes to this happening, because I have experienced this with the latex painted cabinets as well.
 Note: This post was updated in 2021— click here to see Mandi's full kitchen reveal!
We've done a lot of kitchen cabinet projects on the blog, so be sure to check out how Laura refreshed her cabinets in one afternoon and Elsie's tips for painting cabinets. Elsie swears by this method! xo, Mandi
P.S. Check out more cute home decor and kitchen items on our wishlist and shopping pages!
Material Sources:
Wall paint: Benjamin Moore's Super White
Cabinet paint: Annie Sloan's Pure White
Wall tile:The Home Depot
Tile grout: TEC Silverado
Pink sink: Thermocast
Faucet: Kraus from Overstock
Island butcher block: The Home Depot sealed with Waterlox
Flooring: Lumber Liquidators maple engineered wood
Knobs: wooden knobs
Stove: KitchenAid from The Home Depot
Dishwasher: KitchenAid from Home Depot
Coffee maker: KitchenAid (similar here)
Annie Sloan Kitchen Cabinet Paint Colors
Source: https://abeautifulmess.com/painting-cabinets-with-chalk-paint-pros-cons/